How to build a hardwood cutting board from scratch
- Dave
- Aug 12, 2019
- 3 min read
Updated: Dec 27, 2019
I love working on projects that are practical. It gives me a sense of accomplishment to finish a project and then be reminded of my hard work every time I use it. With that in mine I recently decided to to build a cutting board from scratch. Here is the video:
For my cutting board used hard maple. This is a great wood to use because it is durable and it has tight grains which means that it will be smoother with small pores that protect against bacteria.
There are a number of different ways to make a cutting board, including using end grain, edge grain and face grain (not to mention all of those geometrically intricate boards you see nowadays), but for this board I glued pieces together along their edges to make a face grain cutting board.

There are advantages and disadvantages to each type of cutting board. The advantage of a face grain cutting board is that they are quicker to build, usually use less lumber and definitely use less glue. Some of the disadvantages is that they are more prone to warping than edge grain or end grain boards and are more prone to getting scratches than end grain boards. I plan on making more cutting boards in the future and will definitely post more about each type when I do.
I am using rough cut lumber for this project.
I like using rough cut lumber for various reasons, including the prices. It is cheaper to buy lumber like this than getting lumber that has already been planed on one or more edges. I also like doing it because I am generally able to get thicker boards than I could if they were surfaced, especially for smaller projects like this.
After picking my boards and cutting them to a rough length, I used a jointer to get 2 square edges. Next I use a thickness planer to get all of the boards to a uniform thickness. I ran them through a few times to get them to the right thickness.
Now it is time for the glue-up. I am using Tight Bond III which is waterproof and non-toxic; perfect for a cutting board that will get wet on occasion and will come into contact with food.
After letting the glue cure, I decided to run the board through the planer one more time to get it smooth and get rid of any glue squeeze out, but this ended up being a mistake because I got terrible snipe. Snipe is when a planer digs in to the front or back of a workpiece due to how the planer blades and rollers are placed. It is hard to control snipe on a shorter boards like this, but I should have known that this would happen and there are things that you can do to prevent or mitigate it. To fix it, I needed to do some heavy duty sanding.
After sanding, I give the top of the board a gentle round over with the router and the bottom of the board a small chamfer. One of the corners of my board chipped out when I was adding the chamfer, but it wasn't a big deal because I used some super glue and that easily fixed it. Super glue is one of woodworkers best kept secrets.
Next It is time to apply a sealer. There are a lot of different kinds of food safe sealers you can use, but I decided to try a butcher block conditioner which is a mix of mineral oil and
Natural waxes like beeswax. Because this is the first time that I am sealing it, I added a few coats to make sure that it sinks in.
Lastly, I added feet. This is certainly not required, but it helps the cutting board grip and stay sturdy as you use it. It also gives me a place to grab it and keeps it off of surfaces that may be wet.
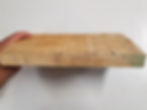
So there you have it. A beautiful cutting board made out of beautiful wood.


