How to Build a Door from Scratch
- Dave
- Oct 11, 2019
- 7 min read
Updated: Dec 27, 2019

I am in the midst of remodeling my office and one of my goals is to create a room that could also be considered an additional bedroom when we go to sell our house someday. In order for that to be possible I took a hallway closet and moved the opening from the hallway to the room. The closet opening that I was left with was small, too small for a standard sized door from a big box store. So, I decided to make one.
The project video is available on my YouTube channel below, but in this post I also add some additional detail that was a bit too much for the video. I hope that it is helpful for you.
Understanding the Anatomy of a Door
There are all different types of door ranging from slab doors to barn doors, but the most basic doors generally consist of three major parts. The rails, the stiles and the panels.

The stiles provide the main structure of the door and take the brunt of the wear. It is very important that the stiles be stable and straight. The rails connect the two stiles together at a few points and the panels fill in the gaps. Rails and stiles are generally made out of the same materials, but panels can vary and even include glass or screens.
Interior doors are generally 80 inches tall and 1-3/8 inches thick (exterior doors are generally thicker). Standard door widths can vary from 30" to 32" to 36". Closet doors can be much smaller, but the smallest pre-fabricated door that most stores sell is 24". The door that I am building is in a space that is much smaller (only about 20 inches).
Preparing and Measuring
The first step in making a door is taking measurements. Doors should generally be around 1/8" to 3/16" smaller than the frame. If you also need to build or install a frame you will need to take the width of the frame into consideration and because shimming a door frame can add some thickness, it is best to wait until after the door frame is installed before building the door. This is exactly what I did as I also needed to build a frame.
Selecting materials
Most interior doors today are made from a material called Masonite, which is a kind of wood fiberboard that is steam cooked and pressure molded onto a thin wood frame to create a slab door that has an appearance of a door with rails stiles and panels. The benefit of these doors is that they are cheap, stable and easy to paint. The downside to them is that they look cheap, they are not very strong (anyone with a teenager who likes to punch things knows that) and don’t always have the best insulation (as they are generally hollow). When making doors yourself the materials you select can have a big difference on the quality and the functionality of the door that you build.
The two things that need to be balanced in selecting materials for a door is strength and stability. For example, plywoods and composite boards like medium density fiberboard (MDF) are very stable, but they are not as strong as wood and can fall apart over time in a way that solid wood will not. Wood is strong, but depending upon the species and how it is treated it can also warp and cause door problems.
Any furniture grade hardwood would be an excellent choice. My door is painted and so I have selected maple as it is cheaper and easy to paint, but poplar or another cheap hardwood would do just as fine. I would avoid using pine lumber unless it is very dry and stable. Most dimensional lumber from the hardware store (e.g. 2x4's) is not dried as much as furniture grade wood and also contains a lot of knots and imperfections and because of that those boards are more prone to warping which is the last thing that you want for your door.
There are many options for the panels. If you are doing raised panels or using solid wood for the panels, you must be aware of wood movement and take precautions or else your door could crack with the changing of the seasons. Plywood and MDF are great options for panels as they are stable and easy to come by. For my door, I used 1/2 inch MDF for the panels.
Building Rails, Stiles and Panels
Once materials are selected it is time to build the components of your door. I started with the stiles as I view them as the most important. Most styles are 4-5 1/2 inches wide, but the width of your stiles depends upon the style of your door. My door is very small and so I opted for 4 inch wide stiles.
It is extremely important that your stiles are square as the functionality and aesthetics of your door will be compromised if they are not. The challenge here is that with most interior doors being around 80 inches tall (which is nearly 7 feet) and it can be very difficult to straighten boards that long. There are many methods including hand planes, table saws, jointers, etc. and each has its pros and cons. I use a jointer but because my jointer has a very short bed, I have to use roller stands to help me extend the bed of the jointer and allow me to straighten these longer boards. For more information, see the YouTube video below. The other components of the door also need to be straight, but it is much easier to square up smaller pieces than larger pieces.
My rails are very short; only 12 inches between the two stiles, but the size will vary depending upon the size of the door. While all rails must be cut to the same length, the width of the rails will vary.

Bottom rails are generally large - around 8-10 inches. I think that this is because the bottom of doors tends to get kicked and you don't want a panel to be kicked in. Top rails are also generally much smaller than the bottom rail, but are also generally slightly larger than middle rails. I believe that this is because the top of a door may sometimes be cut if it does not fit. The top rail on my door measures 6 inches. The middle rails are the smallest and vary in size depending upon the style of the door, but are generally always uniform with each other. My middle rail is around 5 inches.
The panel can be made out of nearly any material as discussed above, but I used 1/2 inch MDF because I had some on hand. When cutting the panel make sure to allow for additional space for the panel to fit in the groove (more on that in the next step)
A few other things to note: the lumber that I generally use is 1 inch thick, but as my interior door is 1 3/8 inches thick, I needed to laminate two boards together to get it to my required thickness. After I laminated the boards I left them in the room for about a week so that the wood could acclimate before I planned them down to the final thickness. This will reduce any potential warping.


Door Joinery
How you put it altogether is very important as poor joints can lead to a failure of the entire door. There are numerous joinery methods, many of which require specialized tools and equipment. Other methods may be time consuming or require special skills. Whatever route you choose, your joints must be structural and provide strength. That rules out solely glue, biscuits, small dowels or even tongue and groove.
I decided to use thick hardwood dowels to join my door together. In order to accomplish this, I created a doweling jig that allowed me to drill all the holes that I need. I created another YouTube video on that process. Check it out here:
In addition to the dowels, I also used a router to create a 1/2 inch groove on all of the inside edges of my rails and stiles. This allowed room for my panels to sit in. In the areas where there weren't any panels, I used a 1/2 inch square spline to give my door even more strength and to align all of my pieces. From there I glued everything up and let the door dry.

Doorknobs and Hinges

With the door built I needed to cut holes for the doorknob and mortise hinges. The standard doorknob hole is 2-1/8 inches thick and either 2-3/8 or 2-3/4 inches from the edge of the door. The cross bore hole for the latch should be 1 inch in diameter right in the centered in the door and the knob hole.
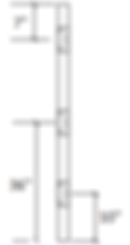
To mortise hinges I use a router bit set at the same height as the hinges, but you can also use a chisel. I think that it is easiest to attach the hinges to the door first before attaching to the frame. Interior door Hinges are generally placed (at center) 10 inches from the bottom, 7 inches from the top and in the center of the door.
Before I install the door, I will measure the hinges that I have already placed on the door and mortise the hinges in the frame if necessary.
Finishing up
After sanding Sanding I painted a coat of primer and two coats of paint. When I built me door, I painted before I drilled the holes and mortised the hinges. In hindsight, however, it would have been better to paint after all of the holes were drilled. This is in part because I scratched some of the paint as I was drilling and laying tools on the door. I had to touch up a few places before I installed the door itself.
Once the door is installed it glides like a dream. The sound of the latch is music to my ears. I love it when a plan comes together!
